> ## Documentation Index
> Fetch the complete documentation index at: https://help.mercury360.com/llms.txt
> Use this file to discover all available pages before exploring further.
# Add Employees | Create Employee Records for HR Workflows
> Create an employee record from the People Directory, add personal and professional details, and choose whether to save as draft or publish.
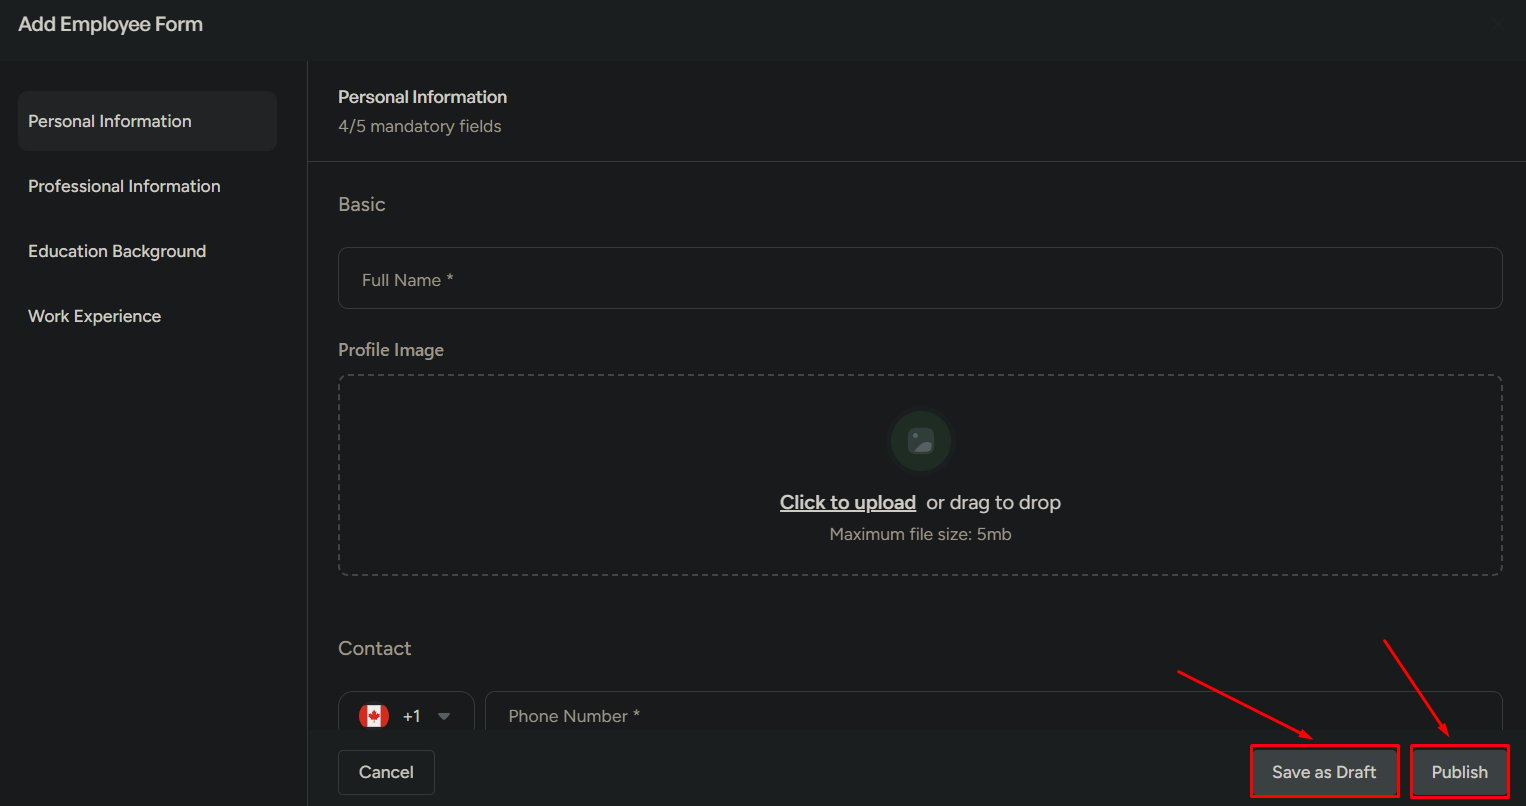
Add an employee when a candidate has been hired or when you need to create an employee profile before onboarding starts. The flow has two steps: **personal details** and **professional details**.
This page is for **creating employee records**, not for tracking onboarding or job applications. For onboarding progress, see [Onboarding](/employees/onboarding).
## When to add an employee
Use this page when:
* A candidate has been **hired** and needs an employee record
* You want to create a profile **before onboarding starts**
* You need to save employee details for the **HR department**
## Start adding an employee
Go to **Employees → People Directory**.
Click **Add Employee** to start the creation flow.
 ## Employee creation flow
Add identity and contact information which is used for basic employee records.
Add work-related information that connects the employee to the organization.
## Step 1 — Personal details
Use this step to identify and contact the employee.
You can add:
* Full name
* Profile image
* Contact number
* Personal email
* Address
Personal details are used for basic identification and communication.
## Step 2 — Professional details
Use this step to define the employee’s work setup.
You can add:
* Work email
* Department
* Resume
Professional details connect the employee to their role and department in the organization.
## Save options
Use this when details are **incomplete**.
* Employee is saved in the system
* Employee **does not appear as active**
* You can edit and complete details later
Best when HR data is still being collected.
Use this when the employee is **ready to be active**.
* Appears in the **People Directory**
* Becomes available for management
* Can be used in **HR workflows**
Only publish when details are confirmed.
## When not to publish yet
Don’t publish if:
* Employee details are **incomplete**
* **Department or role** is not confirmed
* **Hiring is not finalized**
Use **Save as draft** instead.
## Employee creation flow
Add identity and contact information which is used for basic employee records.
Add work-related information that connects the employee to the organization.
## Step 1 — Personal details
Use this step to identify and contact the employee.
You can add:
* Full name
* Profile image
* Contact number
* Personal email
* Address
Personal details are used for basic identification and communication.
## Step 2 — Professional details
Use this step to define the employee’s work setup.
You can add:
* Work email
* Department
* Resume
Professional details connect the employee to their role and department in the organization.
## Save options
Use this when details are **incomplete**.
* Employee is saved in the system
* Employee **does not appear as active**
* You can edit and complete details later
Best when HR data is still being collected.
Use this when the employee is **ready to be active**.
* Appears in the **People Directory**
* Becomes available for management
* Can be used in **HR workflows**
Only publish when details are confirmed.
## When not to publish yet
Don’t publish if:
* Employee details are **incomplete**
* **Department or role** is not confirmed
* **Hiring is not finalized**
Use **Save as draft** instead.
 ## Related
Find and update employees in the People Directory.
Track new joiners through onboarding stages.
## Related
Find and update employees in the People Directory.
Track new joiners through onboarding stages.